
本文摘要:
- 掌握基于SpringBoot框架的程序开发步骤
- 熟练使用SpringBoot配置信息修改服务器配置
- 基于SpringBoot的完成SSM整合项目开发
SpringBoot简介
SpringBoot是由Pivotal团队提供的全新框架,其设计目的是用来简化Spring应用的初始搭建以及开发过程。
使用了SpringMVC框架后已经简化了我们的开发,而SpringBoot又是对SpringMVC开发进行简化的,可想而知SpringBoot使用的简单及广泛性,这就是所谓的项目迭代吧。
既然SpringBoot是用来简化Spring开发的,那我们就先回顾一下,以SpringMVC开发为例
创建一个maven工程,并在pom.xml中导入所需依赖的坐标
1
2
3
4
5
6
7
8
9
10
11
12
13
14
15
16
17
18
19
20
21
22
23
24
25
26
27
28
29
30
31
32
33
34
35
36
37
38
39
40
41
42
43
44
45
46
47
48
49
50
51
52
53
54
55
56
57
58
59
60
61
62
63<dependencies>
<dependency>
<groupId>org.springframework</groupId>
<artifactId>spring-webmvc</artifactId>
<version>5.2.10.RELEASE</version>
</dependency>
<dependency>
<groupId>org.springframework</groupId>
<artifactId>spring-jdbc</artifactId>
<version>5.2.10.RELEASE</version>
</dependency>
<dependency>
<groupId>org.springframework</groupId>
<artifactId>spring-test</artifactId>
<version>5.2.10.RELEASE</version>
</dependency>
<dependency>
<groupId>org.mybatis</groupId>
<artifactId>mybatis</artifactId>
<version>3.5.6</version>
</dependency>
<dependency>
<groupId>org.mybatis</groupId>
<artifactId>mybatis-spring</artifactId>
<version>1.3.0</version>
</dependency>
<dependency>
<groupId>mysql</groupId>
<artifactId>mysql-connector-java</artifactId>
<version>5.1.46</version>
</dependency>
<dependency>
<groupId>com.alibaba</groupId>
<artifactId>druid</artifactId>
<version>1.1.16</version>
</dependency>
<dependency>
<groupId>junit</groupId>
<artifactId>junit</artifactId>
<version>4.12</version>
<scope>test</scope>
</dependency>
<dependency>
<groupId>javax.servlet</groupId>
<artifactId>javax.servlet-api</artifactId>
<version>3.1.0</version>
<scope>provided</scope>
</dependency>
<dependency>
<groupId>com.fasterxml.jackson.core</groupId>
<artifactId>jackson-databind</artifactId>
<version>2.9.0</version>
</dependency>
</dependencies>编写web3.0的配置类
1
2
3
4
5
6
7
8
9
10
11
12
13
14
15
16
17
18
19
20
public class ServletContainersInitConfig extends AbstractAnnotationConfigDispatcherServletInitializer {
protected Class<?>[] getRootConfigClasses() {
return new Class[]{SpringConfig.class};
}
protected Class<?>[] getServletConfigClasses() {
return new Class[]{SpringMvcConfig.class};
}
protected String[] getServletMappings() {
return new String[]{"/"};
}
protected Filter[] getServletFilters() {
CharacterEncodingFilter filter = new CharacterEncodingFilter();
filter.setEncoding("utf-8");
return new Filter[]{filter};
}
}编写SpringMvc配置类
1
2
3
4
5
6
public class SpringMvcConfig implements WebMvcConfigurer {
}编写Controller类
1
2
3
4
5
6
7
8
9
10
11
12
13
14
15
16
17
18
19
20
21
22
23
24
25
26
27
28
29
30
31
public class BookController {
private BookService bookService;
public boolean save( Book book) {
return bookService.save(book);
}
public boolean update( Book book) {
return bookService.update(book);
}
public boolean delete( Integer id) {
return bookService.delete(id);
}
public Book getById( Integer id) {
return bookService.getById(id);
}
public List<Book> getAll() {
return bookService.getAll();
}
}
从上面的 SpringMVC 程序开发可以看到,前三步都是在搭建环境,而且这三步基本都是固定的。SpringBoot 就是对这三步进行简化了。接下来我们通过一个入门案例来体现 SpingBoot 简化 Spring 开发。
SpringBoot快速入门
开发步骤
SpringBoot 开发起来特别简单,分为如下几步:
- 创建新模块,选择Spring初始化,并配置模块相关基础信息
- 选择当前模块需要使用的技术集
- 开发控制器类
- 运行自动生成的Application类
知道了SpringBoot的开发步骤后,下面我们进行具体的操作
步骤一:创建新模块
在IDEA下创建一个新模块,选择Spring Initializr,用来创建SpringBoot工程。
注意jdk版本必须对应,否则会报错。

选中 Web,然后勾选 Spring Web,由于我们需要开发一个 web 程序,使用到了 SpringMVC 技术,所以按照下图红框进行勾选
最后点击创建,就大功告成了,经过以上步骤后就创建了如下结构的模块,它会帮我们自动生成一个 Application 类,而该类一会再启动服务器时会用到
注意:
- 在创建好的工程中不需要创建配置类
- 创建好的项目会自动生成其他的一些文件,而这些文件目前对我们来说没有任何作用,所以可以将这些文件删除。
- 可以删除的目录和文件如下:
.mvn.gitignoreHELP.mdmvnwmvnw.cmd
步骤二:创建Controller
注意:IDEA创建项目时会在com.hit下自动生成一个与项目名同名的包,其中有SpringBoot核心的Application类,因此为了SpringBoot能扫描到你的controller包,需要将controller包放到该目录下:
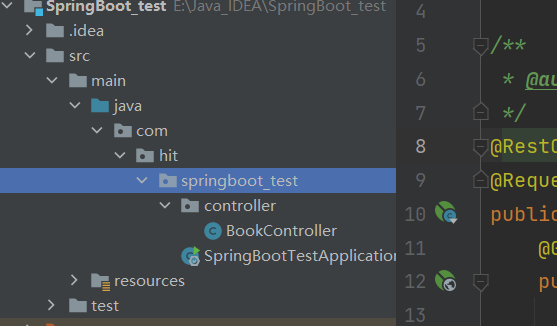
创建BookController,代码如下
1 |
|
步骤三:启动服务器
运行 SpringBoot 工程不需要使用本地的 Tomcat 和 插件,只运行项目 com.hit 包下的 Application 类,我们就可以在控制台看出如下信息
1 | . ____ _ __ _ _ |
测试发现能返回hello,spring boot!
SpringBoot太神了!
SpringBoot访问静态资源
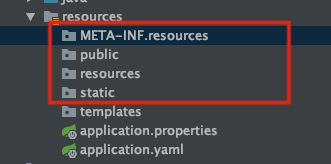
注意:SpringBoot默认配置会访问classpath:/resources/resources目录,但IDEA自动生成的项目结构只有最上层的classpath:/resources目录,因此直接在生成的resources根目录或子目录static和templates目录中写静态资源无法访问到!
项目结构实例:
这个麻烦的问题困扰了半天,最后在这里才找到答案.